
Syringe Actuator
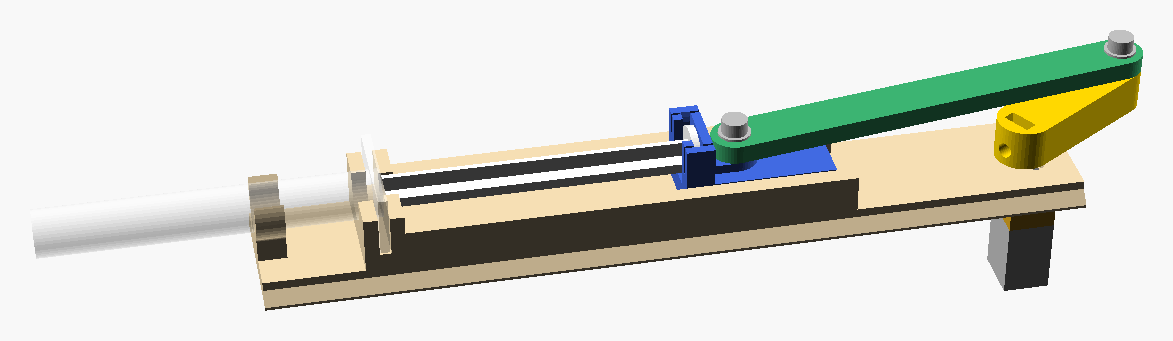
A printed crank that drives a syringe plunger back and forth from a continuously running gearmotor.


Overview
Section titled “Overview”An N20 gearmotor drives 1 to 5 mL luer syringes and a 25 mm GA25 drives 10 to 30 mL, each straight off a supply. A printed crank and connecting rod stroke the plunger over nearly its whole travel, the plunger’s clip guided on rails. The mechanism sits in a printed body: the syringe loads through a lidded window in the roof, the motor’s two wires come out the back, and two patterns of knockout holes take whatever you mount it to. The bought hardware is the syringe, the motor and a few screws.
Status: working prototype; docs/design.md says what has been printed and
run, and records the mechanism, the part dimensions and their sources, and what is open.
Build one
Section titled “Build one”-
Pick the syringe. Each syringe gets its own frame, clip, crank and rod. The N20 syringes share one body, lid and cap, so switching between them reprints only those four. Presets:
Syringe Motor Source 1, 3, 5 mL (two makes of 5 mL) N20 measured unbranded luer-lock syringes 5 mL, both makes ( 5ml-gnr1-ga25,5ml-gnr2-ga25)GA25 the same syringes on the larger motor 20 mL GA25 measured 10, 30 mL GA25 BD Plastipak, estimated to about a millimetre Syringes of the same volume differ by maker, so for any other syringe, or to replace an estimate, measure it and add it as a preset:
docs/measuring.md. -
Export the parts.
just buildwrites every preset’s printed parts tobuild/<syringe>/, or opencad/main.scadin OpenSCAD and pick the syringe and thepartin the Customizer. The parts are the frame, crank, rod, clip, cradle, body, lid and cap.ring_test, not inbuild/but in the Customizer andjust export, prints the syringe’s snap ring alone, to try it first. -
Buy the hardware.
openscad -D 'syringe="3ml"' -D 'part="report"' -o r.csg cad/main.scadlists it for a syringe:Part For What Gearmotor 1 to 5 mL N20, 12 V, about 30 rpm (1000:1), such as Pololu #3046 Gearmotor 10 to 30 mL GA25YN370 (also JGA25-370), 12 V, 30 rpm Motor screws N20 2 x M1.6 x 3 flat head Motor screws GA25 2 x M3 x 4 button head (ISO 7380) Pin screws all 2 x M3 x 10 socket head, with 2 x M3 washers Cap screws all 2 x M3 x 10 Crank all 1 x M3 x 6 set screw, cup point (ISO 4026), and 1 x M3 nut Cradle all 2 x M3 x 8 socket head; 2 x M3 x 6 set screw, cup point, and 2 x M3 nut Threadlocker all blue (medium strength), on every motor and cradle screw -
Print. PLA or PETG, no supports. The body stands on its front wall: 242 mm tall for the N20 syringes, 223 to 313 mm for the GA25’s, so check your printer’s height first. The front wall is what the frame stops against, so it prints flat on the bed; turn on the slicer’s elephant-foot compensation, and use a brim, as it stands tall on a small footprint.
-
Assemble.
- Motor: screw it under the plate first, with threadlocker: its shaft comes up through the plate, and the crank goes on after.
- Cradle: slide it up over the motor to the plate and screw it on from below. Drop the nuts into its slots, then turn the set screws in until the gearbox cannot move. Tighten them again after the first day of running, as the print settles.
- Crank: drop the nut into its slot, press the crank onto the motor’s shaft through the plate, and tighten the set screw onto the shaft’s flat. Join the rod to the crank and the clip with the pin screws over their washers.
- Body: fit any front mounting screws first (step 6), then slide the frame into the body from the back, slide the lid onto its rails from the back, then screw on the cap.
- Syringe: load it through the window: the barrel snaps into its ring and the push-button into the clip.
- Tune: if the clip or the ring holds too loosely or too tightly, change
griporring_gripin the Customizer and reprint that part.
-
Mount it, if you need to. Drill or punch out the knockouts you use: four through the front wall and four through the roof’s shoulders. Your adapter screws to them, M3, with the heads inside the body; fit the front ones before the frame goes in. An adapter drawn in OpenSCAD can take its numbers from the layout:
use <cad/main.scad>, thenL = actuator("3ml");front_x(L)andfront_face(get(L, "body"))give the front wall’s outer face, the body’smount_frontandmount_topthe holes, andtip_x(L)the syringe’s tip, once the syringe’snozzle_lis known.
Using it from another project
Section titled “Using it from another project”Another OpenSCAD project can draw an adapter, or the actuator itself, from the layout:
use <cad/main.scad>, at a tagged release. These names are the public interface:
| Name | What it gives |
|---|---|
actuator(name, motor = "auto") |
the layout for a preset by its name below; motor is "auto", "n20" or "ga25" |
front_x(L) |
the x of the front wall’s outer face, the face an adapter meets |
tip_x(L) |
the x of the syringe’s front end, where its nozzle_l is known |
front_face(get(L, "body")) |
the front wall’s outline in [y, z] |
get(L, "axis_z"), "syringe", "body" |
the syringe axis’s height, the syringe’s row, the body’s spec |
the body’s "mount_front", "mount_top", "end_t", "x" |
the mounting holes, the front wall’s thickness, the inside’s [front, back] x |
body(), lid(), cap() |
the printed body, lid and cap, drawn from the body’s spec |
The presets: 1ml, 3ml, 5ml-gnr1, 5ml-gnr2, 5ml-gnr1-ga25, 5ml-gnr2-ga25, 10ml,
20ml, 30ml. Renaming or removing a preset, or changing what one of these names gives, is a
breaking change; while the version is 0.x, it comes in a new minor version (0.2.0). A preset’s
numbers can still change in any release when its syringe is re-measured, so pin a tag, not main.
Repository layout
Section titled “Repository layout”cad/: the OpenSCAD source;main.scaddraws the assembly or any printed part,purchased/holds the syringes, motors and fasteners,parts/the printed partsdocs/: the design record and the measuring guidetools/: the mesh check behindjust test, the geometry checks behindjust qa, and the renderer behindjust render
Development
Section titled “Development”Tasks run through just; just --list shows them all.
just setup # verify the toolchain: OpenSCAD, topiaryjust check # formatting and every SCAD file evaluating cleanly; CI runs setup, check and test # when anything outside the docs changesjust test # every printed part, for every syringe, exports as one closed solidjust build # every syringe's printed parts to build/<syringe>/, stamped with the commitjust qa # slivers, collisions over a turn and overhangs, for every syringejust render # the pictures listed in cad/views.tsv, to output/figures/<syringe>/just render-parts # every printed part on its own, in its print orientationjust render-stroke # one turn of the crank as an animated GIFContributing
Section titled “Contributing”Contributions are welcome. See the organization contribution guide.
Citation
Section titled “Citation”If you use this project in your work, please cite it. Use the Cite this repository button on
GitHub, or see
CITATION.cff.
License
Section titled “License”Copyright (c) 2026 Syringe Actuator and its contributors.
This project is free software: you may redistribute it and/or modify it under the terms of the GNU
General Public License as published by the Free Software Foundation, either version 3 of the
License, or (at your option) any later version. The parametric CAD source (.scad) is also
licensed under
CERN-OHL-S-2.0,
and the geometry, drawings and bill of materials generated from it under CERN-OHL-S-2.0 alone.
See LICENSING.md for what
applies where, and the organization licensing
policy for why.
Contact
Section titled “Contact”Maintained by the FAST research group. For research collaboration inquiries, contact Dr. Joshua Pearce (joshua.pearce@uwo.ca).